I am very glad to have this ip power 9258. This is Network based power controller - I am able to power on and off all my cisco routers and switches from anywhere in the world. Because this simple unit, I am saving on electricity and cut off my phone calls to my wife and daughter . I used to call them to turn on devices when I am at starbucks studying.
But there is something I discovered with this ip power that very SCARY. It mapped my ip address to a public ip service server located 122.116.138.126 - Anybody in the world could access my network and turn on and off all my devices. Can you imagine if I plug my production servers into this device?
http://122.116.138.129/test/ip_search.asp
I found lot of ip addresses (ip power devices) with default username and password. I could turn off and on if I wanted to scare people specialy on this halloween days.
SO - PLEASE MAKE SURE YOU CHANGED THE PASSWORD AND DENY ANY TRAFFIC TO 122.116.138.129
You can put it to the test. Change the name of your IP 9258 and go to the website and enter the new hostname. You will be scared.
Thursday, October 28, 2010

Thursday, October 14, 2010
VPN filtering using ASDM 6.3 with ASA 8.3

1. You are the new admin of the YAKIMA Company. You decide to filter traffic coming from Oregon to your company. All you want is to allow your users to access only the AS400 server in Oregon.
2. Easy job! You said to yourself. You called the Oregon admin to change the interesting traffic from (10.10.10.0—192.168.1.0) to (10.10.10.100-192.168.1.0) on his side and you are going to do the same from (192.168.1.0 – 10.10.10.0) to (192.168.1.0 – 10.10.10.100).
3. Bummer!!!! The Oregon admin refused saying I don’t want touch that cisco thing. I am not a cisco guy and our cisco consultant is way too expensive. I am sorry I can’t let you touch our device. SO, you are stuck.
4. And then you find me online – another fellow who went to the same dilemma.
5. The solution : VPN filtering using ASDM 6.3 ASA 8.3.4
5.1 Go to Configuration, site-to-site vpn, group policy, click add and internal group policy
Pic1

5.2 Give your policy a name, Uncheck inherit on tunnel protocol and ipv4 filter.
Pc2

Pc2

5.3 click manage and extended ACL, click add ACL, give it a name and then click add ACE – please be careful with the source and destination address – pc3

5.4 click ok twice and you should be back to the internal group policy- click ok - pic4

5.5 Now go to Advanced Tunnel groups, select the correct tunnel , click edit – in the group policy select your new filter policy.pic5
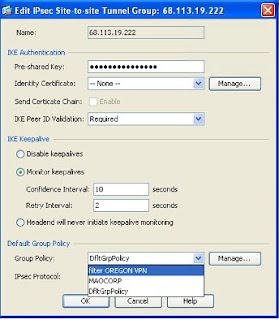
5.6 Click ok and apply –
5.7 It will seems like nothing is working – Now you need to log out the tunnel and ping the server and see the difference
Go to monitoring, vpn, session and choose site-to-site, choose the correct tunnel and click logout.
Pc6

Voila test it and let me know the result.

5.4 click ok twice and you should be back to the internal group policy- click ok - pic4

5.5 Now go to Advanced Tunnel groups, select the correct tunnel , click edit – in the group policy select your new filter policy.pic5

5.6 Click ok and apply –
5.7 It will seems like nothing is working – Now you need to log out the tunnel and ping the server and see the difference
Go to monitoring, vpn, session and choose site-to-site, choose the correct tunnel and click logout.
Pc6

Voila test it and let me know the result.
Thursday, September 30, 2010
SHOW eigrp hello time
It is very simple to know the exact eigrp hello interval on an interface.
The command is :
show ip eigrp (AS) interface detail (interface type)
R2#sh ip eigrp 1 int detail fa0/0.23
IP-EIGRP interfaces for process 1
Xmit Queue Mean Pacing Time Multicast Pending
Interface Peers Un/Reliable SRTT Un/Reliable Flow Timer Routes
Fa0/0.23 1 0/0 4 0/1 50 0
Hello interval is 5 sec
Next xmit serial
Un/reliable mcasts: 0/3 Un/reliable ucasts: 4/4
Mcast exceptions: 1 CR packets: 1 ACKs suppressed: 0
Retransmissions sent: 1 Out-of-sequence rcvd: 0
Authentication mode is not set
Use multicast
R2#
The command is :
show ip eigrp (AS) interface detail (interface type)
R2#sh ip eigrp 1 int detail fa0/0.23
IP-EIGRP interfaces for process 1
Xmit Queue Mean Pacing Time Multicast Pending
Interface Peers Un/Reliable SRTT Un/Reliable Flow Timer Routes
Fa0/0.23 1 0/0 4 0/1 50 0
Hello interval is 5 sec
Next xmit serial
Un/reliable mcasts: 0/3 Un/reliable ucasts: 4/4
Mcast exceptions: 1 CR packets: 1 ACKs suppressed: 0
Retransmissions sent: 1 Out-of-sequence rcvd: 0
Authentication mode is not set
Use multicast
R2#
Sunday, September 12, 2010
quick review of How to enable ssh with a cisco router
here are the steps you need to follow to enable ssh
in config mode
1- hostname ...
2- ip domain-lookup
3- username .... password
4- crypto key-generate rsa
5- ip ssh authentication-retries
6 - ip ssh version
7- line vty 0 4
login local
transport input none
transport input ssh
8 - save your work.
Example from my router:
conf t
Enter configuration commands, one per line. End with CNTL/Z.
R3(config)#hostname SSHSERVER
SSHSERVER(config)#ip domain-name CCIE
SSHSERVER(config)#username BERTRAND password r3
SSHSERVER(config)#crypto key generate rsa
% You already have RSA keys defined named SSHSERVER.CCIE.
% Do you really want to replace them? [yes/no]: y
Choose the size of the key modulus in the range of 360 to 2048 for your
General Purpose Keys. Choosing a key modulus greater than 512 may take
a few minutes.
How many bits in the modulus [512]:
Mar 1 01:31:52.676: %SSH-5-DISABLED: SSH 2.0 has been disabled
1024
% Generating 1024 bit RSA keys, keys will be non-exportable...[OK]
Mar 1 01:32:12.172: %SSH-5-ENABLED: SSH 2.0 has been enabled
SSHSERVER(config)#
SSHSERVER(config)#ip ssh version 2
SSHSERVER(config)#ip ssh authentication-retries 3
SSHSERVER(config)#line vty 0 4
SSHSERVER(config-line)#login local
SSHSERVER(config-line)#transport input none
SSHSERVER(config-line)#transport input ssh
SSHSERVER(config-line)#^Z
SSHSERVER#wr
Building configuration...
access_server#7
% 7 is not an open connection
access_server#6
[Resuming connection 6 to sw1 ... ]
SW1#ssh -l BERTRAND 172.16.50.1 3
Password:
Password:
SSHSERVER>sh ssh
Connection Version Mode Encryption Hmac State Username
66 1.99 IN aes128-cbc hmac-sha1 Session started BERTRAND
66 1.99 OUT aes128-cbc hmac-sha1 Session started BERTRAND
%No SSHv1 server connections running.
SSHSERVER>exit
[Connection to 172.16.50.3 closed by foreign host]
SW1#
in config mode
1- hostname ...
2- ip domain-lookup
3- username .... password
4- crypto key-generate rsa
5- ip ssh authentication-retries
6 - ip ssh version
7- line vty 0 4
login local
transport input none
transport input ssh
8 - save your work.
Example from my router:
conf t
Enter configuration commands, one per line. End with CNTL/Z.
R3(config)#hostname SSHSERVER
SSHSERVER(config)#ip domain-name CCIE
SSHSERVER(config)#username BERTRAND password r3
SSHSERVER(config)#crypto key generate rsa
% You already have RSA keys defined named SSHSERVER.CCIE.
% Do you really want to replace them? [yes/no]: y
Choose the size of the key modulus in the range of 360 to 2048 for your
General Purpose Keys. Choosing a key modulus greater than 512 may take
a few minutes.
How many bits in the modulus [512]:
Mar 1 01:31:52.676: %SSH-5-DISABLED: SSH 2.0 has been disabled
1024
% Generating 1024 bit RSA keys, keys will be non-exportable...[OK]
Mar 1 01:32:12.172: %SSH-5-ENABLED: SSH 2.0 has been enabled
SSHSERVER(config)#
SSHSERVER(config)#ip ssh version 2
SSHSERVER(config)#ip ssh authentication-retries 3
SSHSERVER(config)#line vty 0 4
SSHSERVER(config-line)#login local
SSHSERVER(config-line)#transport input none
SSHSERVER(config-line)#transport input ssh
SSHSERVER(config-line)#^Z
SSHSERVER#wr
Building configuration...
access_server#7
% 7 is not an open connection
access_server#6
[Resuming connection 6 to sw1 ... ]
SW1#ssh -l BERTRAND 172.16.50.1 3
Password:
Password:
SSHSERVER>sh ssh
Connection Version Mode Encryption Hmac State Username
66 1.99 IN aes128-cbc hmac-sha1 Session started BERTRAND
66 1.99 OUT aes128-cbc hmac-sha1 Session started BERTRAND
%No SSHv1 server connections running.
SSHSERVER>exit
[Connection to 172.16.50.3 closed by foreign host]
SW1#
Saturday, September 4, 2010
RemoteApp disconnected - The client could not connect - Remote desktop
I installed RemoteApp from Terminal Server and Distribute the application to all users. But one of the users who work from home (Remote worker - Location: idaho) is experiencing some weird problem.
When he clicked on the Famous software (remote Apps), he receive the message
"The client could not connect. You are already connected to the console of this computer. A new console session cannot be established".
After 30 minutes of troubleshooting, I discovered the cause of the problem and I wanted to share the solution with my audience.
The problem was that the user home network subnet is 192.168.1.0/24 same as my office network and worse his computer has the same ip address as my terminal server 192.168.1.2 -
so when the vpn to our network, the remoteApps is confuse about the exact location of the terminal server because the 192.168.1.2 is belong the host iniated the connection.
To fix the problem without causing too much pain to my users, I changed the user computer IP adddress from 192.168.1.2 to 192.168.1.55 (a ramdom number) and voila the remoteApps work and the client was able to access famous software (it is our accounting software).
But the best way to fix this problem and the one I will recommend is to change the subnet address of the user home network. For example, give it the subnet address of 10.10.10.0/24 if not used in your organization.
Thanks
Wednesday, August 25, 2010
Famous Software - Unable to print tag label
When click save or F12 nothing happens on the screen or the printer label.
Solution: Give full permission to everyone to the following folders:
1- The famous server itself, give full permission to everyone to : c:\famous client
2- In the terminal server give full permission to everyone to c:\famous client
Solution: Give full permission to everyone to the following folders:
1- The famous server itself, give full permission to everyone to : c:\famous client
2- In the terminal server give full permission to everyone to c:\famous client
Famous software - print error 2
Today, the repacking station was acting weird. Tom called me and said that when he click on save (or F12) on famous to print a tag, he receive printer error 2.
Here how I fixed the problem:
Cause: The printer name in the famous propriety is different from the name in the terminal server.
Solution:
1- Go the terminal server and check the name of the printer,
2- On the station, launch famous, click file, proprieties
3- Choose the correct printer name.
Here how I fixed the problem:
Cause: The printer name in the famous propriety is different from the name in the terminal server.
Solution:
1- Go the terminal server and check the name of the printer,
2- On the station, launch famous, click file, proprieties
3- Choose the correct printer name.
Sunday, May 16, 2010
How to connect securely to your home lab
I don't know if I have share this you. But I have a home lab that I connect to from virtually anywhere in the world.
My home lab as an access server cisco 2509. As you surely know, the cisco access server 2509 doesn't support ssh connection and you know how insecure it is to use telnet.
To securely connect to my access server and freely move between my 10 others routers, I setup a remote vpn on my asa 5505.
So, now each time, I want to connect to my home lab to practice, I launch first my cisco vpn client, connect and then telnet to access server located at 10.2.1.3
I will post a video about my configuration step by step.
By the way, I don't have a static IP since my ISP CHARTER COMM can't give me one unless I sign up for the business account which will cost me more than $50.00 than what I am paying right now.
My home lab as an access server cisco 2509. As you surely know, the cisco access server 2509 doesn't support ssh connection and you know how insecure it is to use telnet.
To securely connect to my access server and freely move between my 10 others routers, I setup a remote vpn on my asa 5505.
So, now each time, I want to connect to my home lab to practice, I launch first my cisco vpn client, connect and then telnet to access server located at 10.2.1.3
I will post a video about my configuration step by step.
By the way, I don't have a static IP since my ISP CHARTER COMM can't give me one unless I sign up for the business account which will cost me more than $50.00 than what I am paying right now.
Friday, May 14, 2010
New blog
i am sorry I did not post in this blog since dec 2009.
I started a new blog with google apps and I hope I will be able to link these 2 blogs.
The new blog is http://www.tititec.com
I started a new blog with google apps and I hope I will be able to link these 2 blogs.
The new blog is http://www.tititec.com
Wednesday, December 30, 2009
There has been a signature failure - Norton Ghost - Lenovo
After restoring my ghost image to the lenovo 9485, I got the error "there has been a signature failure".
I can restore the image without any problem with R-tools.
I find this article on the web and try their instruction and it works.
Re: There has been a signature failureOptions
Mark as New
Bookmark
Subscribe
Subscribe to RSS Feed
Highlight
Print
Email to a Friend
Report Inappropriate Content
12-22-2008 07:31 AM
Partition does not boot after being restored with Norton Ghost - NetVista / ThinkCentre / ThinkPad General
Applicable Countries/Regions
Worldwide
Preloaded Software Information
Symptom
The master boot record on affected systems is comprised of 4 sectors, as opposed to the single sector expected by Norton Ghost. Since the boot is dependent on coding contained in all 4 sectors, the system hangs when it attempts to boot to the incomplete master boot record. A "signature failure" error message may also be displayed.
Affected configurations
This symptom apples to any NetVista, ThinkCentre and ThinkPad system using the WinPE Rescue and Recovery partition; as opposed to the PARTIES partition used on NetVista, ThinkCentre and ThinkPad systems prior to 2004.
Solution
The Ghost documentation provides the solution. Use the -IB switch when invoking Ghost from the command line or within a batch file. This should be done on both the image creation. The command line syntax is, C:\> GHOST -IB
A complete list of Ghost command line switches is displayed by typing GHOST ? and pressing the Enter key at the command prompt. For further information, contact Symantec technical support.
Additional information
If you need to Ghost an entire hard drive, including a hidden partition, use the following method:
Enter BIOS, go to Security, and set the predesktop area to "disabled" to make the hidden partition visible on the system with the source drive.
Run Symantec Ghost with the -IB switch when you create the image (example: C:\> GHOST -IB)
After the image is created, make the predesktop area visible on the target system by disabling it.
Restore the image created in step 2. No special switches are needed for this step (for NetVista only).
Reset the predesktop area to "normal", the system may be booted normally to the operating system or to the predesktop area by pressing the Access IBM key during POST.
I can restore the image without any problem with R-tools.
I find this article on the web and try their instruction and it works.
Re: There has been a signature failureOptions
Mark as New
Bookmark
Subscribe
Subscribe to RSS Feed
Highlight
Email to a Friend
Report Inappropriate Content
12-22-2008 07:31 AM
Partition does not boot after being restored with Norton Ghost - NetVista / ThinkCentre / ThinkPad General
Applicable Countries/Regions
Worldwide
Preloaded Software Information
Symptom
The master boot record on affected systems is comprised of 4 sectors, as opposed to the single sector expected by Norton Ghost. Since the boot is dependent on coding contained in all 4 sectors, the system hangs when it attempts to boot to the incomplete master boot record. A "signature failure" error message may also be displayed.
Affected configurations
This symptom apples to any NetVista, ThinkCentre and ThinkPad system using the WinPE Rescue and Recovery partition; as opposed to the PARTIES partition used on NetVista, ThinkCentre and ThinkPad systems prior to 2004.
Solution
The Ghost documentation provides the solution. Use the -IB switch when invoking Ghost from the command line or within a batch file. This should be done on both the image creation. The command line syntax is, C:\> GHOST -IB
A complete list of Ghost command line switches is displayed by typing GHOST ? and pressing the Enter key at the command prompt. For further information, contact Symantec technical support.
Additional information
If you need to Ghost an entire hard drive, including a hidden partition, use the following method:
Enter BIOS, go to Security, and set the predesktop area to "disabled" to make the hidden partition visible on the system with the source drive.
Run Symantec Ghost with the -IB switch when you create the image (example: C:\> GHOST -IB)
After the image is created, make the predesktop area visible on the target system by disabling it.
Restore the image created in step 2. No special switches are needed for this step (for NetVista only).
Reset the predesktop area to "normal", the system may be booted normally to the operating system or to the predesktop area by pressing the Access IBM key during POST.
Thursday, December 10, 2009
Multiple instance of google talk
1. Right-click on the desktop
2. Select New
3. Select Shortcut
4. Paste this into the text box:
"c:\program files\google\google talk\googletalk.exe" /nomutex
5. Click Next. Name it Google Talk Multiple
Click OK until you are done.
6. Sign out from google talk and uncheck remember password
7. Double clic the new icon and enter your username and password for the first account - check remember password if you want
8. Double clic the new icon and enter your username and password for the second account - check remember password if you want
9. Repeat the same process if you have more than 2 accounts.
2. Select New
3. Select Shortcut
4. Paste this into the text box:
"c:\program files\google\google talk\googletalk.exe" /nomutex
5. Click Next. Name it Google Talk Multiple
Click OK until you are done.
6. Sign out from google talk and uncheck remember password
7. Double clic the new icon and enter your username and password for the first account - check remember password if you want
8. Double clic the new icon and enter your username and password for the second account - check remember password if you want
9. Repeat the same process if you have more than 2 accounts.
Tuesday, December 8, 2009
Convaincing reason to leave users off vlan 1
see ciscopress bcmsn (ccnp) page 544 pdf version.
All hosts on VLAN 1 (PC-1, PC-2, and PC-3) will experience the broadcast storm. All trunk
links between switches will transport the broadcast frames. In addition, all switch supervisor
CPUs will receive and process the broadcasts because each switch has an IP address for
management assigned to VLAN 1. (For this reason, it is recommended to reserve VLAN 1 for
control protocol traffic only. User-generated broadcasts can overload the switch supervisor to
the extent that it no longer can keep track of its control or “overhead” protocols, such as VTP,
CDP, and so forth. Instead, all user traffic should be kept off VLAN 1.)
All hosts on VLAN 1 (PC-1, PC-2, and PC-3) will experience the broadcast storm. All trunk
links between switches will transport the broadcast frames. In addition, all switch supervisor
CPUs will receive and process the broadcasts because each switch has an IP address for
management assigned to VLAN 1. (For this reason, it is recommended to reserve VLAN 1 for
control protocol traffic only. User-generated broadcasts can overload the switch supervisor to
the extent that it no longer can keep track of its control or “overhead” protocols, such as VTP,
CDP, and so forth. Instead, all user traffic should be kept off VLAN 1.)
How to get google labs with a google apps account
Is Google labs missing from your google apps account?
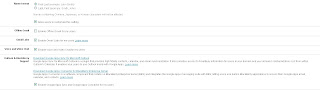
Here are the step to get your google labs :
1- to dashboard in your google apps account
2- clic domain setting
3- check mark Enable pre-release features and save
4- dashboard and clic service setting
5- clic email
6- check mark Enable Gmail Labs for my users
7- save.
It takes couple hours for the google labs to display in your users setting -- so be patient.

Here are the step to get your google labs :
1- to dashboard in your google apps account
2- clic domain setting
3- check mark Enable pre-release features and save
4- dashboard and clic service setting
5- clic email
6- check mark Enable Gmail Labs for my users
7- save.
It takes couple hours for the google labs to display in your users setting -- so be patient.


Monday, December 7, 2009
Upside-Down Display In Windows XP
To revert to a right-side up display, hold down the CTRL, ALT and UP (arrow) keys.
Tuesday, November 24, 2009
How to wipe out your blackberry 8830 series
It is easy to wipeout your blackberry 8830 devices
1- Press the blackberry menu button
2- option (the wrench tool)
3-Security options (scroll down to see it)
4-General setting (first line )
5-Desktop (the last line - your have to scroll down)
6- Wipe Handhelp (2nd line)
7- Press continue
8- enter blackberry
and voila
1- Press the blackberry menu button
2- option (the wrench tool)
3-Security options (scroll down to see it)
4-General setting (first line )
5-Desktop (the last line - your have to scroll down)
6- Wipe Handhelp (2nd line)
7- Press continue
8- enter blackberry
and voila
Saturday, November 14, 2009
Difference between spanning-tree portfast bpduguard default and spanning-tree bpdufilter
source :
http://www.blogger.com/post-create.g?blogID=7181412395554836857
Understanding How PortFast BPDU Filtering Works
Release 12.1(13)E and later releases support PortFast BPDU filtering, which allows the administrator to prevent the system from sending or even receiving BPDUs on specified ports.
When configured globally, PortFast BPDU filtering applies to all operational PortFast ports. Ports in an operational PortFast state are supposed to be connected to hosts, that typically drop BPDUs. If an operational PortFast port receives a BPDU, it immediately loses its operational PortFast status. In that case, PortFast BPDU filtering is disabled on this port and STP resumes sending BPDUs on this port.
PortFast BPDU filtering can also be configured on a per-port basis. When PortFast BPDU filtering is explicitly configured on a port, it does not send any BPDUs and drops all BPDUs it receives.
Caution Explicate configuring PortFast BPDU filtering on a port that is not connected to a host can result in bridging loops as the port will ignore any BPDU it receives and go to forwarding.
When you enable PortFast BPDU filtering globally and set the port configuration as the default for PortFast BPDU filtering (see the "Enabling PortFast BPDU Filtering" section), then PortFast enables or disables PortFast BPDU filtering.
If the port configuration is not set to default, then the PortFast configuration will not affect PortFast BPDU filtering. Table 16-1 lists all the possible PortFast BPDU filtering combinations. PortFast BPDU filtering allows access ports to move directly to the forwarding state as soon as the end hosts are connected.
Table 16-1 PortFast BPDU Filtering Port Configurations
Per-Port Configuration
Global Configuration
PortFast State
PortFast BPDU Filtering State
Default
Enable
Enable
Enable1
Default
Enable
Disable
Disable
Default
Disable
Not applicable
Disable
Disable
Not applicable
Not applicable
Disable
Enable
Not applicable
Not applicable
Enable
1 The port transmits at least 10 BPDUs. If this port receives any BPDUs, then PortFast and PortFast BPDU filtering are disabled.
http://www.blogger.com/post-create.g?blogID=7181412395554836857
Understanding How PortFast BPDU Filtering Works
Release 12.1(13)E and later releases support PortFast BPDU filtering, which allows the administrator to prevent the system from sending or even receiving BPDUs on specified ports.
When configured globally, PortFast BPDU filtering applies to all operational PortFast ports. Ports in an operational PortFast state are supposed to be connected to hosts, that typically drop BPDUs. If an operational PortFast port receives a BPDU, it immediately loses its operational PortFast status. In that case, PortFast BPDU filtering is disabled on this port and STP resumes sending BPDUs on this port.
PortFast BPDU filtering can also be configured on a per-port basis. When PortFast BPDU filtering is explicitly configured on a port, it does not send any BPDUs and drops all BPDUs it receives.
Caution Explicate configuring PortFast BPDU filtering on a port that is not connected to a host can result in bridging loops as the port will ignore any BPDU it receives and go to forwarding.
When you enable PortFast BPDU filtering globally and set the port configuration as the default for PortFast BPDU filtering (see the "Enabling PortFast BPDU Filtering" section), then PortFast enables or disables PortFast BPDU filtering.
If the port configuration is not set to default, then the PortFast configuration will not affect PortFast BPDU filtering. Table 16-1 lists all the possible PortFast BPDU filtering combinations. PortFast BPDU filtering allows access ports to move directly to the forwarding state as soon as the end hosts are connected.
Table 16-1 PortFast BPDU Filtering Port Configurations
Per-Port Configuration
Global Configuration
PortFast State
PortFast BPDU Filtering State
Default
Enable
Enable
Enable1
Default
Enable
Disable
Disable
Default
Disable
Not applicable
Disable
Disable
Not applicable
Not applicable
Disable
Enable
Not applicable
Not applicable
Enable
1 The port transmits at least 10 BPDUs. If this port receives any BPDUs, then PortFast and PortFast BPDU filtering are disabled.
Tuesday, October 13, 2009
Exchange 2003/2007 Change User name and email address
source : http://www.amset.info/exchange/usernamechange.asp
User Name Changes
Author: Simon Butler, Exchange MVP, MCSE
Last Page Review: 06/07/2009
A common request is to to adjust the personal details for a user, usually female after a wedding (or a divorce).
This can also be asked for when someone replaces another member of staff.
However, you do have a number of options available to you when making the change. The options depend on how adamant the user is about their former name being totally eradicated.
The Alias Issue
Changing most settings in Exchange is quite easy and is outlined below.
The significant issue is the alias of the account. This is seen by the user's in their auto complete menu, and is the part in < > : Jane Smith.
While you can change the alias quite easily in Active Directory Users and Computers (Exchange 2003) or Exchange Management Console (Exchange 2007), this does have consequences, mainly for other people, not the user who is changing their name.
Auto complete entries will no longer work. They will need to be deleted and reselected from the Global Address List.
No one will be able to automatically reply to old email that has been sent by the user under the old alias. When clicking Reply they will need to find the user, delete them from the list of recipients and select them from the Global Address List.
You may also have problems with users in Outlook 2003 or higher and cached mode. They could have inaccurate information until a new Offline Address Book is generated.
New email and external email (whether inbound or outbound) is not affected.
The same issues occur if you rename an account totally - so the account shows Jane Smith
Method One - User Account Rename
If the user is happy for the alias to show the old name, then you can simply rename the account and update display names. This method is not recommended for a new member of staff, as it can cause confusion.
While this is a fairly straightforward process if not done correctly can mean a mixture of the old and the new name appearing throughout the system.
You should also time the change carefully. Make the change out of hours so that old inaccurate information is shown in the GAL for the shortest amount of time. If you have users on cached mode in Outlook 2003 and higher, make the change and then generate a new OAB so that they have an opportunity to get the latest information as soon as possible.
Exchange 2003
Use ADUC on the Exchange 2003 server. Ensure that the user is logged off when making the change. If a newlywed, during the honeymoon is a perfect time to make the changes.
Start ADUC and find the user listed.
Right click on the user and choose Rename. Correct the name as required and press enter.
A new dialogue box should not be brought up, which gives you the opportunity to correct all aspects, including the username.
In the example below, we are changing "Hazel Taylor" in to "Hazel Smith".
After pressing ok the main name change has been completed.
Exchange 2007
For Exchange 2007, open the properties of the user in the Exchange Management Console and adjust the name as required. If you want to change the user's login name and personal directory, then you will need to use ADUC.
Email Addresses
You shouldn't forget to adjust the email address of the user to take in to account the new name.
Right click on user again, and choose Properties.
Click on the "Email Addresses" tab.
Add the new email address in the same format as your existing email addresses. Leave the old address in place.
Change the default address to the new one.
By doing this, any email sent in on the old address will still be delivered, but all new email will go out with the new address.
With Exchange 2007, the Email Address Policy should update the email address to the new name. After that has happened, simply add the previous email address to the list.
Other Settings
If you are using some kind of personal drive space on the server that is mapped by username (ie \\server\%username% then you need to rename the folder.
On the workstation while the login will be in the new format, the folder in Documents and Settings will be in the old name, and will continue to work. If you want to change that as well, it is best to create a new profile.
Login as an administrator and rename the profile. A good suggestion is to add the suffix .old - "username.old"
Login as the user again and a new profile will be created. Copy data and settings from the old profile.
Outlook 2002 (and higher) Auto Complete
One thing that you cannot control is the auto complete on the latest versions of Outlook. You will need to instruct your users on how to clear the old name from the Auto Complete cache, then select the new name from the GAL fresh. Once the new name has been selected once, it will populate the auto complete list.
More information on Auto Complete and working with its cache can be found here.
Method Two - New Account
The second method that you can deal with a user changing their name is to create a new account. The old account is left in place.
To ensure that all email is caught, do the following...
Create the new account as normal, and populate it with the correct (new) email address, group memberships etc.
Put a new dummy SMTP address on to the old account and set it as default.
Remove the existing SMTP addresses from the old account and put them on to the new account. This means that any email coming in from outside on the old address is delivered to the new mailbox.
Exmerge the contents of the old mailbox and import it in to the new one.
Configure a forward on the old account to forward to the new account. For Exchange 2003 do this in Active Directory Users and Computers, User Properties, Exchange General, Delivery Options. For Exchange 2007 do this in the Exchange Management Console, Mail Flow Settings, Delivery Options.
Hide the account from the global address list, remove its group memberships etc. The account is no longer required for anything other than email, so can have most settings removed.
Setup the workstation etc and move the data around to limit the impact of the new account on the user - as explained above under "Other Settings".
The end result on this method is that other's auto complete entries continue to work, replies to old emails get delivered directly (via the old m
User Name Changes
Author: Simon Butler, Exchange MVP, MCSE
Last Page Review: 06/07/2009
A common request is to to adjust the personal details for a user, usually female after a wedding (or a divorce).
This can also be asked for when someone replaces another member of staff.
However, you do have a number of options available to you when making the change. The options depend on how adamant the user is about their former name being totally eradicated.
The Alias Issue
Changing most settings in Exchange is quite easy and is outlined below.
The significant issue is the alias of the account. This is seen by the user's in their auto complete menu, and is the part in < > : Jane Smith
While you can change the alias quite easily in Active Directory Users and Computers (Exchange 2003) or Exchange Management Console (Exchange 2007), this does have consequences, mainly for other people, not the user who is changing their name.
Auto complete entries will no longer work. They will need to be deleted and reselected from the Global Address List.
No one will be able to automatically reply to old email that has been sent by the user under the old alias. When clicking Reply they will need to find the user, delete them from the list of recipients and select them from the Global Address List.
You may also have problems with users in Outlook 2003 or higher and cached mode. They could have inaccurate information until a new Offline Address Book is generated.
New email and external email (whether inbound or outbound) is not affected.
The same issues occur if you rename an account totally - so the account shows Jane Smith
Method One - User Account Rename
If the user is happy for the alias to show the old name, then you can simply rename the account and update display names. This method is not recommended for a new member of staff, as it can cause confusion.
While this is a fairly straightforward process if not done correctly can mean a mixture of the old and the new name appearing throughout the system.
You should also time the change carefully. Make the change out of hours so that old inaccurate information is shown in the GAL for the shortest amount of time. If you have users on cached mode in Outlook 2003 and higher, make the change and then generate a new OAB so that they have an opportunity to get the latest information as soon as possible.
Exchange 2003
Use ADUC on the Exchange 2003 server. Ensure that the user is logged off when making the change. If a newlywed, during the honeymoon is a perfect time to make the changes.
Start ADUC and find the user listed.
Right click on the user and choose Rename. Correct the name as required and press enter.
A new dialogue box should not be brought up, which gives you the opportunity to correct all aspects, including the username.
In the example below, we are changing "Hazel Taylor" in to "Hazel Smith".
After pressing ok the main name change has been completed.
Exchange 2007
For Exchange 2007, open the properties of the user in the Exchange Management Console and adjust the name as required. If you want to change the user's login name and personal directory, then you will need to use ADUC.
Email Addresses
You shouldn't forget to adjust the email address of the user to take in to account the new name.
Right click on user again, and choose Properties.
Click on the "Email Addresses" tab.
Add the new email address in the same format as your existing email addresses. Leave the old address in place.
Change the default address to the new one.
By doing this, any email sent in on the old address will still be delivered, but all new email will go out with the new address.
With Exchange 2007, the Email Address Policy should update the email address to the new name. After that has happened, simply add the previous email address to the list.
Other Settings
If you are using some kind of personal drive space on the server that is mapped by username (ie \\server\%username% then you need to rename the folder.
On the workstation while the login will be in the new format, the folder in Documents and Settings will be in the old name, and will continue to work. If you want to change that as well, it is best to create a new profile.
Login as an administrator and rename the profile. A good suggestion is to add the suffix .old - "username.old"
Login as the user again and a new profile will be created. Copy data and settings from the old profile.
Outlook 2002 (and higher) Auto Complete
One thing that you cannot control is the auto complete on the latest versions of Outlook. You will need to instruct your users on how to clear the old name from the Auto Complete cache, then select the new name from the GAL fresh. Once the new name has been selected once, it will populate the auto complete list.
More information on Auto Complete and working with its cache can be found here.
Method Two - New Account
The second method that you can deal with a user changing their name is to create a new account. The old account is left in place.
To ensure that all email is caught, do the following...
Create the new account as normal, and populate it with the correct (new) email address, group memberships etc.
Put a new dummy SMTP address on to the old account and set it as default.
Remove the existing SMTP addresses from the old account and put them on to the new account. This means that any email coming in from outside on the old address is delivered to the new mailbox.
Exmerge the contents of the old mailbox and import it in to the new one.
Configure a forward on the old account to forward to the new account. For Exchange 2003 do this in Active Directory Users and Computers, User Properties, Exchange General, Delivery Options. For Exchange 2007 do this in the Exchange Management Console, Mail Flow Settings, Delivery Options.
Hide the account from the global address list, remove its group memberships etc. The account is no longer required for anything other than email, so can have most settings removed.
Setup the workstation etc and move the data around to limit the impact of the new account on the user - as explained above under "Other Settings".
The end result on this method is that other's auto complete entries continue to work, replies to old emails get delivered directly (via the old m
Monday, October 12, 2009
CISCO FLASH - Delete files and director from flash of a cisco router
You can use : erase flash:
But if you don't want to be prompted to confirm or if the directory content a sub directory of file, you should use the following command:
delete /force/recursive flash:
e.g.
delete /flash/recursive flash:/phone
But if you don't want to be prompted to confirm or if the directory content a sub directory of file, you should use the following command:
delete /force/recursive flash:
e.g.
delete /flash/recursive flash:/phone
Saturday, October 10, 2009
BEST NTP SERVER FOR VOICE_LAB
I am using 2 ntp servers for my home voip_system - home lab
ntp server 204.9.54.119
ntp server 129.6.15.29
ntp server 204.9.54.119
ntp server 129.6.15.29
Friday, October 9, 2009
How To Configure Dual ISP Backup with Cisco ASA 5505 Firewall
How To Configure Dual ISP Backup with Cisco ASA 5505 Firewall by Harris Andrea
in Networks
SOURCE: http://www.goarticles.com/cgi-bin/showa.cgi?C=1446826
In this article I will explain how to configure a Cisco ASA 5505 firewall to connect to dual ISPs for redundancy purposes. Suppose that we have a primary high-speed ISP connection, and a cheaper DSL line connected to a Secondary ISP. Normally all of our traffic should flow through the primary ISP. If the primary link fails, the secondary DSL connection should be utilized for Internet access. Please note that the above scenario is valid only for Outbound traffic (i.e. from our internal network towards the Internet). The functionality that I will describe below works for ASA 5505 version 7.2(1) and above.
Assume that we are assigned a static Public IP address of 100.100.100.1 from Primary ISP and another static Public IP address of 200.200.200.1 from our Backup ISP. We will use Ethernet 0/0 for connecting to Primary ISP, Ethernet 0/1 for connecting to our Internal LAN, and Ethernet 0/2 for connecting to our Backup ISP. We will create three VLANs to support our configuration. VLAN1 (the default Vlan) will be assigned to Ethernet 0/1 (inside), VLAN2 will be assigned to Ethernet 0/0 (primary-isp) and VLAN3 will be assigned to Ethernet 0/2 (backup-isp). We also have to configure two static default routes pointing to the ISP gateway address. The primary ISP default route shall have a metric of 1 and the backup ISP default route shall have a metric bigger than 1 (let's say 2). Let us see the configuration below:
ASA5505(config)# interface ethernet 0/0
ASA5505(config-if)# switchport access vlan 2
ASA5505(config-if)# no shutdown
ASA5505(config)# interface ethernet 0/1
ASA5505(config-if)# switchport access vlan 1
ASA5505(config-if)# no shutdown
ASA5505(config)# interface ethernet 0/2
ASA5505(config-if)# switchport access vlan 3
ASA5505(config-if)# no shutdown
ASA5505(config)# interface vlan 1
ASA5505(config-if)# nameif inside
ASA5505(config-if)# security-level 100
ASA5505(config-if)# ip address 192.168.1.1 255.255.255.0
ASA5505(config-if)# no shutdown
ASA5505(config)# interface vlan 2
ASA5505(config-if)# nameif primary-isp
ASA5505(config-if)# security-level 0
ASA5505(config-if)# ip address 100.100.100.1 255.255.255.0
ASA5505(config-if)# backup interface vlan 3
ASA5505(config-if)# no shutdown
ASA5505(config)# interface vlan 3
ASA5505(config-if)# nameif backup-isp
ASA5505(config-if)# security-level 1
ASA5505(config-if)# ip address 200.200.200.1 255.255.255.0
ASA5505(config-if)# no shutdown
ASA5505(config)# route primary-isp 0.0.0.0 0.0.0.0 100.100.100.2 1
ASA5505(config)# route backup-isp 0.0.0.0 0.0.0.0 200.200.200.2 2
in Networks
SOURCE: http://www.goarticles.com/cgi-bin/showa.cgi?C=1446826
In this article I will explain how to configure a Cisco ASA 5505 firewall to connect to dual ISPs for redundancy purposes. Suppose that we have a primary high-speed ISP connection, and a cheaper DSL line connected to a Secondary ISP. Normally all of our traffic should flow through the primary ISP. If the primary link fails, the secondary DSL connection should be utilized for Internet access. Please note that the above scenario is valid only for Outbound traffic (i.e. from our internal network towards the Internet). The functionality that I will describe below works for ASA 5505 version 7.2(1) and above.
Assume that we are assigned a static Public IP address of 100.100.100.1 from Primary ISP and another static Public IP address of 200.200.200.1 from our Backup ISP. We will use Ethernet 0/0 for connecting to Primary ISP, Ethernet 0/1 for connecting to our Internal LAN, and Ethernet 0/2 for connecting to our Backup ISP. We will create three VLANs to support our configuration. VLAN1 (the default Vlan) will be assigned to Ethernet 0/1 (inside), VLAN2 will be assigned to Ethernet 0/0 (primary-isp) and VLAN3 will be assigned to Ethernet 0/2 (backup-isp). We also have to configure two static default routes pointing to the ISP gateway address. The primary ISP default route shall have a metric of 1 and the backup ISP default route shall have a metric bigger than 1 (let's say 2). Let us see the configuration below:
ASA5505(config)# interface ethernet 0/0
ASA5505(config-if)# switchport access vlan 2
ASA5505(config-if)# no shutdown
ASA5505(config)# interface ethernet 0/1
ASA5505(config-if)# switchport access vlan 1
ASA5505(config-if)# no shutdown
ASA5505(config)# interface ethernet 0/2
ASA5505(config-if)# switchport access vlan 3
ASA5505(config-if)# no shutdown
ASA5505(config)# interface vlan 1
ASA5505(config-if)# nameif inside
ASA5505(config-if)# security-level 100
ASA5505(config-if)# ip address 192.168.1.1 255.255.255.0
ASA5505(config-if)# no shutdown
ASA5505(config)# interface vlan 2
ASA5505(config-if)# nameif primary-isp
ASA5505(config-if)# security-level 0
ASA5505(config-if)# ip address 100.100.100.1 255.255.255.0
ASA5505(config-if)# backup interface vlan 3
ASA5505(config-if)# no shutdown
ASA5505(config)# interface vlan 3
ASA5505(config-if)# nameif backup-isp
ASA5505(config-if)# security-level 1
ASA5505(config-if)# ip address 200.200.200.1 255.255.255.0
ASA5505(config-if)# no shutdown
ASA5505(config)# route primary-isp 0.0.0.0 0.0.0.0 100.100.100.2 1
ASA5505(config)# route backup-isp 0.0.0.0 0.0.0.0 200.200.200.2 2
Subscribe to:
Posts (Atom)


